Lupo — Malware IOC Extractor
Debugging module for Malware Analysis Automation
UPDATE: As requested by some readers, I have added a video walk-through at the end of this post, after the conclusion.
Note: I was supposed to be teaching a class at Paranoia 2020 in Norway this year but the conference couldn’t go ahead due to COVID-19. As part of the class I was planning to release the beta version of this tool I wrote — Lupo. Since I couldn’t teach at Paranoia 2020, I decided to go ahead and release the tool anyway. The show must go on…

Introduction
Working on security incidents that involve malware, we come across situations on a regular basis where we feel the need to automate parts of the analysis process as complete manual analysis is, more often than not, not possible for every case due to many factors (time, skills, scale etc.).
I wrote Lupo mainly to automate and accelerate the process as much as possible. Lupo is a dynamic analysis tool that can be used as a module with the debugger. The first version works with the popular Windows Debugger — WinDbg. I’ll release versions for other debuggers in the future.
The way the tool works is pretty straight forward. You load Lupo into the debugger and then execute it. It runs through the malware and collects predefined IOC and writes them to a text file on the disk. You can then use this information to contain and neutralise malware campaigns or simply respond to the security incident that you are working on.
Lupo — the tool
I’ll give some more details on the tool itself but not too much to the inner workings of it, at least not here. We need to keep in mind that the malware authors are smart enough to quickly tweak the code to create problems for us!
The tool is written in C++ and uses the Windows Debugging framework to execute the code. It can be used with WinDbg as a ‘plugin’ in order to help automate the analysis process.
If you want to know more about the tool, feel free to contact me or comment below.
Download
You can get Lupo from my Github Repo here.
Usage
Using the tool is very easy. It works in this way:
- Save the Lupo extension in your extensions dir (default: sdk\samples\exts subdirectory of the installation directory). You can also define the extensions path by using the command ‘.extpath[+] [Directory[;…]]’.
- Start the debugger
- Attach the process to be debugged (malware in this case)
- Load Lupo using the ‘.load’ command.
- Execute Lupo by using this command: ‘lupo.go’
- All results will be displayed in the console and also written to a new textfile on the disk. Path and name of this textfile will be displayed in console as well. All done!
- You can optionally use the results from Lupo with this other tool that I wrote — Ragno, to advance your research and response by aggregating OSINT for the wider footprint of the campaign you are possibly dealing with. You can read about Ragno in another post here.
Step by Step Demo
Get the tool
You can download the files at GitHub: https://github.com/vithakur/lupo
Setup your debugging environment
You’ll need the WinDbg debugger installed and working before you can use Lupo for automating your C2i extraction.
Get WinDbg here: https://docs.microsoft.com/en-us/windows-hardware/drivers/debugger/debugger-download-tools
Once WinDbg is good to go, copy Lupo files into the extension dir, default being:
C:\Program Files (x86)\Windows Kits\10\Debuggers\x86\winextStart the debugging session
To start analyzing malware, first of all make sure your VM is off the network (preferably on a host-only config).
Execute the malware and once the process is active, attach it to the debugger. Once attached, the process will be paused after hitting the first breakpoint.


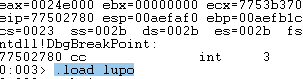
Load Lupo
Once the process has been attached successfully and the first interrupt has been reached, we can now load Lupo into the debugger. To load the plugin, use this command in the debugger:
.load lupo
After loading Lupo, you can check if it has been loaded successfully into the debugger by running the chain command:
.chainThe results will show you if the plugin is loaded and ready for use. You can also click on the plugin name in order to show the available plugin commands (based on plugin modules).

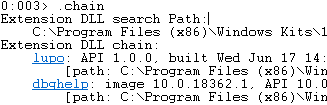
As you can see in the image below, currently you have one command available, that executes the plugin:


Run Lupo
At this point, we are ready to execute Lupo by running the following command:
!lupo.go
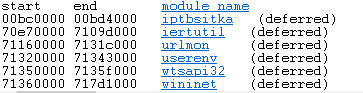
The first set of results that Lupo returns is a list of all loaded modules:

Lupo will write the output to a text file on disk and will print the file name before it starts so that you can have a look after the analysis is complete:

Results
And the last thing Lupo will output to the console is the list of C2 IPs/URLs that it will extract from the malware. This list will also be available in the output file that is saved locally.

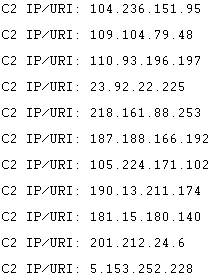


And that’s it! You can use this extracted information to respond to malware incidents or for your threat intelligence purposes.
ToDo
These are the few things that need to done in the near future:
- Introduce termination functionality — as soon as all the info needed has been harvested, the execution should stop. At this time, if the malware doesn’t terminate, Lupo keeps going until manually broken (Debug → Break)
- Standalone Engine: this would result in Lupo functioning as an independent tool, not relying on a debugger
- Other debuggers: the plan is to integrate Lupo into other popular debuggers such as Olly, Immunity and x64/32Dbg.
- Feature requests will also be taken on the project at Github.
Conclusion
Lupo is a tool that was written completely based on the needs that came out of real-world Incident Response work. To respond to security incidents at scale, automation is required. Lupo aims to automate as much of the process as possible without losing sight of the importance of human skill in directing the analysis process. Lupo, in its current form, speeds up the process of extracting usable IOC from malicious binaries quite considerably and also allows new analysts to be super-productive when it comes to quick response. For everything else, there’s always your friendly(!) neighbourhood reverse engineer :)
Video Walk-through
Part 1: Copy the DLLs into the debugger extension dir
Part 2: Load the main DLL into the debugger
Part 3: Run Lupo, sit back and relax ;)
Comments
Post a Comment